Setting up VPN Gateway with Raspberry PI (VPN Router)
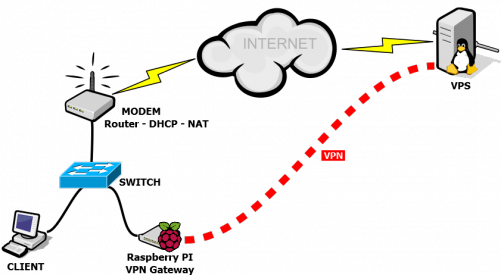
The increasing availability of High-grade and budget friendly VPS (virtual private server) services accelerated personal projects. Raspberry PI and DigitalOcean VPS helped me alot while getting my VPN Gateway (VPN Router) project done. It works in site-to-site VPN model and we are going to be able to tunnel all our LAN traffic pass trough our VPS. In this model, we are going to be able to use remote VPS‘s Internet connection.
Paid/Free VPN service providers provide very slow Internet connection in practice without any reason. By using this project, I have pushed my daily Internet traffic trough Europe based VPS servers to Turkey without feeling any slowness, for many years. According to my personal experience, below 100ms packet latency doesn’t noticeably effect web surfing experience.
I choosed RaspberryPI from among various miniPC alternatives, because it is widely used, has its own Debian based custom OS named Raspbian, and consumes about 3W power. Its computing power is good enough for prototype projects and personal usage.
Setup Steps:
Lets begin with setting up OpenVPN Client on RaspberryPI (planning to write a blog post about setting up OpenVPN server on the DigitalOcean VPS later);
After setting up Raspbian on RaspberryPI and access to the consol via SSH, it is time to upgrade and update the OS;
sudo apt-get update && sudo apt-get upgrade && sudo apt-get dist-upgrade
Setting a static IP address is important. DHCP server can fix the IP address or we can set it to the interface. We set a static IP on the interface;
nano /etc/network/interfaces
We should change the lines below according to our network topology (had better to choose an IP out of the DHCP scope);
iface eth0 inet static
address 192.168.2.251
netmask 255.255.255.0
gateway 192.168.2.1
To enable packet forwarding functionality, we change a line in the file below;
nano /etc/sysctl.conf
remove the line’s comment or add the line below in to the conf file;
net.ipv4.ip_forward = 1
to activate changes;
sysctl -p /etc/sysctl.confSetting up OpenVPN Client;
To install OpenVPN CLI Client, enter the following command;
sudo apt-get install openvpn
When the VPN Box starts up, VPN profile can automatically connect to the VPN server. For that, create the config file below in the folder (.conf extension is necessary);
sudo nano /etc/openvpn/vpn.conf
example conf file;
client

dev tun
proto tcp
tun-mtu 1500
remote xx.xx.xx.xx 1194

resolv-retry infinite
nobind

persist-key
persist-tun

verb 3

keepalive 10 120
comp-lzo
cipher DES-CBC

#to run openvpn with root privileges;
user <user_name>
group <group_name>
daemon

script-security 2
up /etc/openvpn/update-resolv-conf
down /etc/openvpn/update-resolv-conf

<ca>
-----BEGIN CERTIFICATE-----
.........
-----END CERTIFICATE-----
</ca>
<cert>
-----BEGIN CERTIFICATE-----
.........
-----END CERTIFICATE-----
</cert>
<key>
-----BEGIN PRIVATE KEY-----
.........
-----END PRIVATE KEY-----
</key>
For automatic VPN connection, change the file below;
nano /etc/default/openvpn
remove the comment or add the following line into the config file;
AUTOSTART=all
We have completed our OpenVPN client installation at this point.
Configuring Iptables;
To be easy-to-use and to be like plug-and-play, we define a NAT rule for the tunnel network. Apply the following command;
sudo iptables -t nat -A POSTROUTING -o tun0 -j MASQUERADE
For permanent iptables rules, we use iptables-persistent. Follow commands below;
sudo apt-get install iptables-persistent
sudo /etc/init.d/iptables-persistent save
sudo /etc/init.d/iptables-persistent reload
If everything went well, after a reboot, our VPN box starts up, VPN profile gets connected and our VPN Gateway box transmits packets through the VPS as desired.
We can use two different way to route network traffic to the VPN Gateway. The first way is defining the IP address of the VPN Gateway for the Default Gateway field in the DHCP service config. The second one is defining IP address of the VPN Gateway to the client’s interface as default gateway within static IP configuration.
In our configuration, all network traffic goes into the VPN tunnel including DNS queries. With some minor changes, this configuration can be converted to a VPN Hotspot project as well. Please comment below to help further updates of this tutorial.
Hamdi OZCAN – ozcan.com
Thanks for the info! I really think this is a great idea and recently learned about changing the default gateway in this way :) didn’t know that was possible.
I have a similar setup with Ubuntu on a server, no Raspberry Pi. My clients connect to the Internet via the VPN tunnel of the default gateway so that’s great. But the DNS requests of my clients don’t go through the tunnel… When I try https://www.dnsleaktest.com on my server (the default gateway) it shows that those DNS requests do go through the tunnel… Do you have an idea how I can automatically let all clients forward DNS requests to the default gateway? I have a dd-wrt router with DNSMasq and ip tables…
You should give a DNS IP to your clients which is neither in your network nor remote server’s IP. In that way your clients and your VPN gateway send their DNS requests to their default gateway.
Thanks for the reply! I’m not sure if I understand it, but I was able to achieve my goal by adding the following line to my DNSMasq configuration on my dd-wrt router:
“dhcp-option=6,10.4.0.1,10.5.0.1”
Those are the two main DNS servers of my VPN provider. Now the DNS requests by all my network clients are resolved by my VPN provider :)
Hamdi; great piece of writing, solved my multiple router setup problems for good ;)
I’m using a quite similar setup with PureVPN as VPN-Provider and pdnsd to get faster DNS-Responses from my Raspberry – fetching all DNS requests through the tunnel isn’t good for the speed: https://www.kadder.de/2013/12/raspberry-pi-als-vpn-gateway/
Especially the DNS-request can slow down normal surfing (for streaming etc. it doesn’t matter, but sometime I like to simple surf via the VPN-tunnel…)
Thanks for the how-to ; I experience the following issue: it works well, until I reboot. Then I can’t access to the raspberry using ssh – Getting connection refused.
Any idea ?
Hi Hamdi,
Very good piece of writing for setting up vpn gateway with RSBPI (vpn router). I have a problem and not sure if vpn router will help. I used microchip ic to creat a project with built in TCP/IP stack withh ssl. SSL in no longr safe and hence TLS is to be used, but Microchip do not have TLS LIB to support this any more.
Referance your diagram, I like to connect my project with ip via RSBPI and have the RSBPI do the protection from WAN. Can you solution help me?
Many thanks
@dee Yes, you can tunnel your IP traffic by using a similar setup and the traffic will be guarded. OpenVPN accepts a wide range of possible TLS cipher-suites including TLSv1.2 (considered more secure then SSL 3.0).
Will setup act as a bridge? I am looking for ways to escape CGNAT, and am wondering if this setup will allow me to access my servers at home from outside? Am also looking at Digital Ocean for VPS
Thanks,
Anton
Thanks for the info,
My Router is 192.168.1.1 and VPN has Static IP address, My remote users get 10.8.x.x IP and I am wondering if I use route or NAT, Can I have access to my network computers by Remote Desktop on this IP range 172.16.x.x ?
Help me understand what this does:
remote xx.xx.xx.xx 1194
Thanks
@Mike It is the remote VPN server.